ADVERTISEMENTS:
Are you researching on experiments on Practical Zoology? Do you want to create an amazing science fair project for your next exhibition? You are in the right place. The below given article includes a collection of twenty experiments on practical zoology for helping you to complete your next project/assignment.
Contents:
- Experiment on Squamous Epithelium
- Experiment on Columnar Epithelium
- Experiment on Ciliated Epithelium
- Experiment on Smooth (Involuntary) Muscle
- Experiment on Skeletal (Voluntary) Muscle
- Experiment on Haemin Crystals
- Experiment on Grasshopper Testis
- Experiment on Salivary Gland Chromosome
- Experiment on Human Sex Chromatin
- Experiment on Cytochemical Staining to Determine DNA
- Experiment on Blood Film
- Experiment on Count of Erythrocytes: (Red Blood Corpuscles)
- Experiment on Count of Leucocytes (White Blood Corpuscles)
- Experiment on Blood Grouping
- Experiment on Erythrocyte Sedimentation Rate
- Experiment on Estimation of Haemoglobin
- Experiment on Separation of Lymphocytes from Peripheral Blood
- Experiment on Determination of Bleeding Time (B.T.) in Human
- Experiment on Preparation of Cell Suspension from Lymphoid Organ
- Experiment on Haemolymph Study of Cockroach
1. Experiment on Squamous Epithelium:
Present on the outer-surface of the skin, peritoneum in the body cavity and other sites.
ADVERTISEMENTS:
Preparation:
i. Moisten the palm of your hand with a little amount of water. Scrape the skin of the palm with the long edge of a slide. Put the fine scrapings on a clean slide, add a little water, spread the scrapings uniformly on the slide and fix it by passing rapidly three times over a Bunsen burner flame. In case of a spirit lamp flame, the motion of the slide should be a bit slow. The scrapings may also be fixed with 90% ethyl alcohol.
ii. Put a frog/toad partially submerged in water in a glass trough. After sometime, small flakes of epidermal cells, discarded from the skin (it is a continuous process) of frog/toad will be seen floating on water. Collect a few of them with a fine brush, transfer to a slide and fix over flame or with 90% ethyl alcohol.
iii. Open the abdomen of a frog/toad. Cut a small piece of the peritoneum. Put it on an albumen coated slide. Add a drop of water and stretch it with two needles. Allow the water to evaporate. It may also be fixed with Schaudinn’s fluid. Stain with borax carmine or any other dye. Dehydrate, clear and mount.
ADVERTISEMENTS:
Structure:
(Fig. 33.1)
i. Cells are flat and arranged like tiles on a floor.
ii. Nucleus may or may not be discernible.
2. Experiment on Columnar Epithelium:
Present in mucous membrane of vertebrate intestine.
Preparation:
Fix a small piece of intestine of a freshly killed frog/toad for 6 to 24 hours or more in 4% formaldehyde solution or 70% alcohol. Open it with a longitudinal incision. Remove the contents of the gut with a fine brush taking care not to damage the epithelium.
Scrape the mucous membrane very carefully with a fine scalpel. Transfer the scrapings to a slide, put a little water and spread the scrapings uniformly. Fix over a flame or with 90% alcohol. Stain, dehydrate and mount.
ADVERTISEMENTS:
Structure:
(Fig. 33.2)
i. Cells are tall, length exceeding the width.
ADVERTISEMENTS:
ii. Nucleus prominent, usually elongate oval.
3. Experiment on Ciliated Epithelium:
Present in the lining of the roof of the mouth cavity and pharynx. The mucous membrane of the stomach and intestine of many molluscs is lined with ciliated epithelium.
Preparation:
Gently scrape the roof of the mouth cavity or the mucous membrane of the pharynx of a live frog/toad with a bent spatula. Transfer the scrapings to a slide, spread uniformly, fix and make a permanent stained preparation.
ADVERTISEMENTS:
Structure:
(Fig. 33.3)
i. Cells are columnar with a prominent nucleus.
ADVERTISEMENTS:
ii. The free border bears many clia.
4. Experiment on Smooth (Involuntary) Muscle:
Preparation:
Cut a small piece of small intestine. Open the tube with a longitudinal incision. Wash out the contents with 0.6 per cent saline water and place it in saline water in a petri dish. Holding the outer wall of the piece of intestine with a pair of stout forceps peel off the mucous membrane (inner lining membrane) with a pair of fine forceps.
The mucous membrane can be removed by scraping with the back of a scalpel but this may damage the muscle fibres of the wall. Separate a narrow strip of the outer wall with needles and put on a glass slide containing two drops of saline water.
Tease the intestinal wall carefully with two needles and isolate a few muscle fibres (cells) from the rest. Remove rest of the wall from the slide and drain out the water. Arrange the fibres parallel to one another on the slide. Better result is obtained if separation of the fibres is done under a dissecting binocular.
5. Experiment on Skeletal (Voluntary) Muscle:
Preparation:
ADVERTISEMENTS:
Separate thigh muscle from the femur (thigh bone) and put it in 0.6% saline water in a large watch glass. Separate a narrow band from the thigh muscle with the help of needles and put it on a glass slide containing two drops of saline water. Rest of the procedure is similar to that adopted for smooth muscle.
Fixation and staining:
To fix the muscle fibres on the slide, drain out the excess saline water and allow the rest to evaporate. Pass the slide over the flame of a burner or spirit lamp for only once and twice respectively. It must not be repeated.
Pour sufficient quantity of 1 per cent methyline blue (a vital dye) on the slide and wait for 1-5 minutes. Wash with double glass distilled water.
Temporary preparation may be made with 50% glycerine. For permanent preparation, mount in canada balsam or DPx after dehydration with upgrades of alcohol.
6. Experiment on Haemin Crystals:
Crystals are homogeneous solids, bounded by plane faces and having a geometric shape.
ADVERTISEMENTS:
Preparation:
A small amount of dry blood is taken on a glass slide and crushed to a fine powder with the help of the fused end of a glass rod or with a needle. One crystal of common salt (NaCI) is added to it, which is also crushed to powder. The two are thoroughly mixed and two drops of glacial acetic acid added to it.
The mixture is covered with a cover slip and the slide heated over the flame of a spirit lamp. The reaction is complete with the beginning of boiling of the mixture and the slide is quickly removed from the flame.
The preparation is allowed to cool and examine under a microscope, initially under low magnification and then under high magnification.
Structure:
(Fig. 33.4)
Man:
Rhomboidal plates and prisms, often arranged in star-shaped clusters with round edges.
Rat:
Narrow plates with varying width to needles, blunt at both the ends.
Guinea pig:
Triangular plates often arranged in the form of squares.
7. Experiment on Grasshopper Testis:
The testes of grasshoppers are paired, situated ventral to the alimentary canal in the abdomen. Each testis consists of a few lobules.
Preparation:
Dissect a grasshopper to expose the testes. Put a few drops of physiological solution on the testes. Take out a few testis lobes and fix in Carnoy’s fluid for 2 to 4 hours. Separate the lobes. Stain them in a watch glass in acetocarmine. Period required for staining varies from 5 to 20 minutes, depending on the size of the testis lobe. Put a stained testis lobe on a slide.
Add 1 or 2 drops of glacial acetic acid. Cover with a cover slip and heat gently. Apply uniform pressure on the cover slip with your thumb and the testis lobe is smashed. Remove excess fluid, if any, by soaking with a piece of blotting paper. Seal the cover slip with bee’s wax or nail polish.
Observe different stages of cell division (Fig. 34.1).
8. Experiment on Salivary Gland Chromosome:
Salivary glands are minute, paired bodies at the anterior region, close to pharynx.
Preparation:
Dissect a fruit fly larva and take out salivary glands. For preparation of chromosomes follow the technique adopted for squash preparation of grasshopper testis.
Structure:
(Fig. 34.2)
i. Size large.
ii. Presence of series of light and dark bands.
9. Experiment on Human Sex Chromatin:
A chromatin mass is present in the nucleus of interphase somatic cells of a normal human female. This is termed as sex chromatin or Barr body (Figs. 34.3 and 34.4). The sex chromatin is absent in the somatic cells of a normal human male.
Preparation:
Gently scrape the roof of the buccal cavity of a human female with a spatula. Transfer the scrapings to a clean, grease free slide and prepare a thin smear. If necessary, a drop of distilled water may be added. Fix the smear with aceto-alcohol for about a minute.
Pass the slide through downgrades of alcohol, 90%, 70%, 50%, 30% and then water to hydrate the cells. Stain with 1% aceto-orcein or haematoxylin. Period of staining varies from one minute in undiluted stain to 10 minutes in diluted stain depending on the concentration of the dye.
Wash in distilled water. Mount in glycerine and seal the cover slip with bee’s wax or nail polish. The number of Barr body is one in normal human female. A definite relationship exists between the number of X-chromosomes and Barr bodies (Figs. 34.3 & 34.4).
10. Experiment on Cytochemical Staining to Determine DNA (Feulgen Method):
Preparation:
i. Dissect out the salivary gland of 3rd instar larva of Drosophila and put it in 1: 1 aceto-ethanol mixture for half an hour. Rinse in distilled water.
ii. Hydrolyse in 1N HCI for 8-10 minutes. Rinse in distilled water and put a few drops of leucobasic fuchsin solution (Schiff reagent). Wait for 30 minutes. The magenta colour appears.
iii. Transfer the gland to a drop of 45% acetic acid at the centre of a glass slide. Place a cover slip over it. Cover the set with a piece of blotting paper. Smash the gland applying uniform pressure with thumb. Observe under a microscope for DNA.
iv. For making permanent preparation place the slide in acetic-alcohol mixture. The cover slip will drop at the bottom. Take out the slide, dehydrate clean in Xylol and mount in DPX.
Observation:
The chromosome with deep magenta color region indicates DNA molecules.
11. Experiment on Blood Film:
Preparation:
Take two clean slides. Clean the ball of a finger of one of your classmates with 70% alcohol. Dry thoroughly and puncture the finger ball boldly to a depth of about 2 mm with a sharp edge, sharp pointed, sterile needle. Blood flows out freely from the wound.
Touch the blood drop with the end of a clean slide, close to its edge. Put the slide with the drop of blood (not larger than a pin head) on a table. Hold it firmly with your left hand. Place the narrow edge of another clean slide in front of the drop of blood touching it.
In a second or two blood spreads across the edge of the slide. Slowly but boldly draw the slide along the whole length of the first slide keeping it at 45° angle with the former. A thin blood film (tongue-shaped) is formed over the slide (Fig. 51.1). Dry the blood film immediately by waving the slide quickly in air to prevent shrinkage of blood cells.
12. Experiment on Count of Erythrocytes: (Red Blood Corpuscles – R.B.C.):
Total count:
Total count of blood cells is usually done with a Thoma-Zeiss haemocytometer.
R.B.C. pipette:
It is graduated to dilute blood 1 in 100 or 1 in 200. On the stem of the pipette is marked 0.5 and 1 and 101 just above the bulb. The bulb of the pipette has a volume of 100 units and the stem a volume of 1 unit (Fig. 51.2).
Counting slide:
The counting chamber in the slide is of known capacity (Figs. 51.3-51.5). A special thick cover slip is used at the time of counting. The counting chamber measures 1 x 1 mm. It is divided into 5 x 5 = 25 small squares. Each small square measures 1/5 x 1/5 mm.
It is again divided into 4 x 4 = 16 smallest squares (Fig.53.4). Each smallest square measures 1/20 x 1/20 mm and the area is 1/400 sq mm. The depth of the squares is 1/10 mm. Therefore the volume of one smallest square is 1/400 x 1/10 = 1/4000 c mm (cubic millimetre).
Diluting fluid:
The most commonly used diluting fluid for routine classwork is formol-citrate solution. It is a solution of 1% formalin in 31.3 g/litre trisodium citrate.
Technique:
Prick the finger tip with a needle. Wipe out first drop of blood. Suck the free flowing blood from the prick in the R.B.C. pipette held horizontally, to 0.5 mark. Wipe the tip of the pipette clean, dip vertically into the blood diluting fluid and gently suck the fluid up to mark 101 (Fig. 51,2B).
Close the tip of the pipette with finger and mix the content thoroughly with a twisting motion. The capillary of the pipette is occupied by the diluent even after mixing and the dilution is really 0.5 in 100, i.e., 1 in 200.
The cover slip is centrally placed over the bar of the counting chamber. About ⅓rd of the thoroughly mixed diluted blood is rejected by blowing it out of the pipette. Hold the pipette at 45° angle with the slide touching the space between the cover slip and the slab. The fluid runs under the cover slip by capillary action. Allow the flow till the space between the grooves of the slide under the cover slip is just filled.
If air bubbles are trapped under the cover slip remove those by moving the cover slip to the edge of the slab and thereby allow the air to escape. Wait for 3 minutes and check for even distribution of blood cells under the low power of a microscope. In case of uneven distribution of blood cells reject the preparation and make a fresh one. Counting is done under high power of a microscope.
Calculation:
For calculation of total number of red blood corpuscles in 1 c mm (cubic millimeter), all the corpuscles in 5 small squares, i.e., 80 smallest squares are counted. The corpuscles touching the left and lower line of the square and those inside the square are taken into account. Those touching the right and upper line of the square are excluded (Fig. 51.5).
Volume of one smallest square = 1/4000 c mm.
Volume of 80 smallest squares = 80 x 1/4000 = 1/50 c mm.
If the number of cells in 1/50 c mm is X, the number of cells in 1 c mm = X x 50.
The dilution of blood is 1 in 200.
The number of cells in 1 c mm undiluted blood = X x 50 x 200.
N.B. As a rule the total number of R.B.C. in 1 c mm undiluted blood may be obtained by adding 4 zeros to the number present in 80 smallest squares.
13. Experiment on Count of Leucocytes (White Blood Corpuscles: W.B.C.):
The counting of number of white blood corpuscles (W.B.C.) is expressed in two ways. Counting of total number of cells as total count (TC), and the count of different kinds of leucocytes separately as differential count (DC).
The five types of W.B.C. are:
(a) Polymorphonuclear neutrophils,
(b) Polymorphonuclear eosinophils,
(c) Polymorphonuclear basophils,
(d) Monocytes and
(e) Lymphocytes.
A. Total Count:
Equipment’s and technique:
The equipment’s used for leucocyte count are same except the markings on pipette which allow a dilution of blood 1 in 20. The mark above the bulb is 11 in a W.B.C. pipette (Fig. 51.2A). The procedure adopted in leucocyte count is same as in R.B.C. count. Blood is drawn up to 0.5 mark, and W.B.C. diluting fluid up to 11 mark.
Diluting fluid:
A 3% acetic acid solution in distilled water.
Calculation:
The area of the counting chamber is 1 sq mm and the volume is 1 sq mm x 1/10 mm. The W.B.C. in all the small squares are counted.
If the number of cells in 1/10 c mm is X, the number in 1 c mm = X x 10
The dilution of blood is 1 in 20
The total number of W.B.C. in 1 c mm undiluted blood = X x 10 x 20 or X x 200
B. Differential count:
The differentiation of white blood corpuscles is based on their size and shape of nucleus and differential staining of nucleus and cytoplasm with Giemsa or Leishman stain.
Technique:
Prepare blood film following standard technique and stain with Giemsa or Leishman stain.
Observation:
Count 100 or 200 W.B.C. noting the type on a sheet of paper and calculate the percentage.
Calculation:
The percentage of different types of W.B.C. is calculated with the formula
% of W.B.C. type = No. of type of cells/Total No. of W.B.C. counted x 100
The normal value of various W.B.C. (type):
14. Experiment on Blood Grouping:
The serum of a person may cause agglutination of the red blood corpuscles (R.B.C.) of another person. Depending on the presence or absence of two agglutinogens A and B in erythrocytes and two specific agglutinins anti-A (α) and anti-B (β) in the serum, human blood groups are designated as A, B, AB and O. An R.B.C. may have either or both factors (A, B, AB) or none at all. A serum may have either or both factors (α, β, αβ) or none at all.
If the corpuscles contain A, the serum contains β, the blood group is A. If the corpuscles contain B, the serum contains a the blood group is B. If the corpuscles contain both A and B, the serum is free from α and β, the blood group is AB (universal receiver). If the corpuscles contain neither A nor B, the serum contains both α and β, the blood group is O (universal donor).
Test tube method of blood grouping:
i. Collect 2 drops of blood in a small test tube containing 1 or 2 ml physiological saline solution.
ii. Take two small test tubes and put one drop of corpuscle suspension and one drop of saline solution in each. Add one drop of anti-A (α) serum in one tube and anti-B (β) serum in the second tube. Prepare four such sets.
iii. Mix the contents of each tube gently and allow to stand at room temperature for one hour, though positive reactions can be detected within a few minutes. Examine contents of each tube under the low power of a microscope for agglutination (Fig. 51.6).
Results:
a. Agglutination by α but not by β= Croup A
b. Agglutination by β not by α = Group B
c. Agglutination by both α and β = Group AB
d. No agglutination by α and β = Group O.
15. Experiment on Erythrocyte Sedimentation Rate (E.S.R.):
A. Preparation of anticoagulant:
i. Ammonium-potassium oxalate (Double oxalate):
Ammonium oxalate…………… 1.2 g
Potassium oxalate……………. 0-8 g
Distilled water to make……. 100 ml
Potassium oxalate causes shrinkage of blood cells. A combination of ammonium and potassium oxalate in 3 : 2 is used to avoid shrinkage of cells. The solution contains 20 mg oxalate per ml. 0.1 ml of this solution is pipetted into a container and dried in an incubator or oven. The resultant powder is sufficient for 5 ml blood.
ii. Sodium-citrate solution (3.8%):
Sodium citrate 3.8 g
Distilled water to make 100 ml
B. Collection of blood samples:
For haematological investigation collect venous blood with a disposable syringe.
C. Estimation of sedimentation rate with Wintrobe’s haematocrit tube:
(Fig. 51.7)
a. Wintrobes Haematocrit tube:
i. It is a thick walled glass tube 11 cm long. The internal diameter is 2.5 mm and the base is flat.
ii. Calibration—1 mm to 100 mm and the capacity about 1 ml.
iii. The markings are in reversed direction. Those on the left side are for ESR and those on the right side for PCV (Packed cell volume).
Procedure:
Put 2 ml blood in the oxalated vial and shake for 3 minutes. Fill the Wintrobe’s tube with oxalated blood up to the ‘0’ or 10 mark above with a capillary pipette. Note the time and allow the tube to stand perfectly in a vertical position. Take the reading after 1 hour at room temperature. The length of the column of clear plasma shows the sedimentation from mark zero (‘O’) to top of the red cell column.
The normal limit in Indian:
Man 4 to 14 mm 1 hour
Woman 6 to 20 mm 1 hour
b. Westergren method:
i. Westergren tube is a thick-walled pipette (open at both ends). The length is 300 mm of which lower 200 mm is graduated and the upper 100 mm un-graduated.
ii. The inner diameter is 2.5 mm.
Procedure:
Take 0.5 ml 3.8% sodium citrate solution in a dry glass tube. Collect 2 ml venous blood and put into the citrated tube. Mix thoroughly. Draw well-mixed citrated blood into the Westergren tube up to the mark ‘0’ with a teat or mechanical device (avoid mouth suction). Set the tube upright in the stand (Fig. 51 -8) with a spring clip at the top and a rubber sheet below. Read after 1 hour and 2 hours.
Calculation of average ESR = Reading of 1 hr + Reading (both the hours)/2
16. Experiment on Estimation of Haemoglobin (Hb%):
Principle (Sahli Method):
The haemoglobin per cent in vertebrate blood is estimated by acid-haematin method.
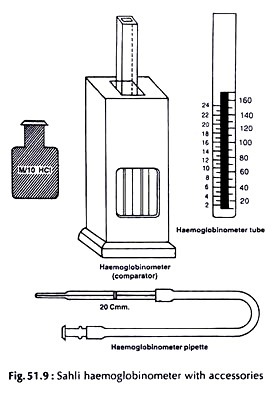
Haemoglobin is converted to brown acid haematin with the addition of N/10 (0.1 N) hydrochloric acid. The brown colour is compared with standard brown glass plate (Fig. 51.9).
Requirements:
i. Haemoglobinometer tube:
It is a square graduated tube marked on both the sides in ascending order. The marks on the left side show g of Hb per 100 ml and on the right side indicate percentage.
ii. Haemoglobin comparator:
A mounted standard brown glass plate.
iii. Haemoglobin pipette:
A special slender pipette with a single mark 20 c mm.
iv. Vertebrate blood.
v. Decinormal (N/10) HCl solution. (1.2 ml concentrated HCI is diluted to 100 ml with distilled water.)
Procedure:
i. The haemogiobinometer tube is filled to the lowest mark (20) with N/10 HCI.
ii. Draw blood up to 20 c mm of the pipette from finger prick (p. 533) or from some other vertebrate. Wipe off the blood on outside the pipette with gauge or tissue paper.
iii. Empty the pipette in the tube by touching the point of the pipette to the bottom of the tube and gently blowing off the blood without causing bubble. Rinse the pipette at least three times by drawing in and discharging the blood- acid mixture.
iv. Withdraw the pipette half way up the tube and rinse the outside of the pipette with a few drops of the acid.
v. Mix the acid-haematin solution with a glass rod and keep the tube in the comparator for at least 10 minutes. The brown color of acid-haematin develops.
vi. The brown solution is diluted drop wise with distilled water and stirred with a stirrer until the color matches with the standard brown glass plate in the comparator.
vii. The matching of color should be done only against natural light.
Reading:
The mark tallying with the upper level of diluted acid-haematin indicates the level of haemoglobin and is expressed in terms g per 100 ml blood.
Normal level of Hb:
Human – Male……………….. 14.16 g %.
Female ………… 13.15 g%.
New born baby …………….. 16.18 g %.
Toad ………………… 6.9 g %.
17. Experiment on Separation of Lymphocytes from Peripheral Blood:
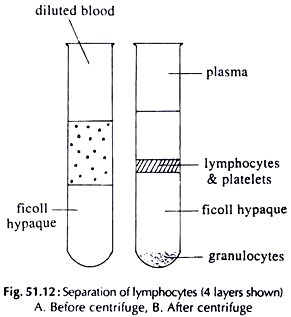
The separation of lymphocytes from the peripheral blood is done by density gradient method.
Requirements:
i. . Heparinized blood.
ii. Minimum essential medium (MEM).
iii. Ficoll hypaque—density 1-077 g/M (commercially available: Sigma chemicals).
iv. Trypan blue (0-1% in normal saline).
v. Pasteur pipettes with long capillary.
Procedure:
i. Dilute heparinized blood with MEM at the ratio 1 : 2.
ii. Take ficoll hypaque in centrifuge tubes. Keep the tubes in a slanting position. Take diluted blood, thrice the volume of ficoll in a Pasteur pipette and layer the ficoll by allowing a slow flow of blood along the inner surface of the centrifuge tube.
iii. Centrifuge at room temperature at 400 g for 30 minutes.
iv. Four separate layers appear (Fig. 51.12).
The layers are:
i. Plasma and dilutent
ii. White interface containing lymphocytes
iii. Ficoll hypaque
iv. Pellet containing erythrocytes and platelets.
v. Carefully aspirate the cells at the interface.
vi. Wash the lymphocytes with MEM before use.
vii. Check the viability of the cell with tripan blue.
18. Experiment on Determination of Bleeding Time (B.T.) in Human:
Procedure:
i. Prick the sterilised fingertip with a sterile prick needle and let a drop of blood to appear. Start the stop watch.
ii. Dab the blood drop with a small piece of blotting paper or filter paper without touching the skin (do not wipe off the blood) every three seconds.
iii. Mark when the filter paper is no longer stained and stop the watch.
Observation:
i. Note the time from the appearance of the drop of blood to the time when bleeding stops.
ii. Stop of bleeding is noted when the filter paper does not take up stain.
The normal B.T. in human is 2 to 5 minutes.
19. Experiment on Preparation of Cell Suspension from Lymphoid Organ:
Thymus, spleen, lymph nodes, etc. are used to prepare cell suspension.
Requirements:
i. Any lymphoid organ from a white rat.
ii. Tissue culture medium e.g. MEM.
Procedure:
i. Remove any lymphoid organ (e.g. spleen) from a mouse. Place it in a petri dish in MEM.
ii. Perfuse the spleen with the help of a hypodermic syringe and needle by repeatedly passing MEM through to flush out RBCs and the spleen appears like a white capsule.
iii. Press the spleen gently with the help of the flat side of the piston of the syring, and the lymphocytes are expelled out of the capsule. Pass the medium containing lymphocytes through 26 gauge needle.
iv. Collect the suspension in a test tube.
v. Wait for 10 minutes, till the tissue particles or clumps settle down.
vi. Aspirate the supernatant and centrifuge at 2500 RPM for 5 minutes.
vii. Re-suspend the pellet in a known amount of MEM to prepare single-cell suspension.
viii. Count the cells with a Thoma-Zeiss counting slide (p. 534) and prepare a suspension of known concentration of cells.
20. Experiment on Haemolymph Study of Cockroach:
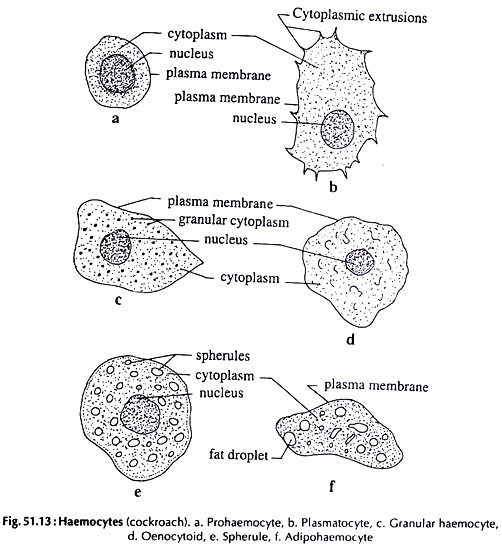
The haemolymph of cockroach consists of a fluid called plasma and cellular elements — haemocytes. Haemocytes are identified in temporary or permanent preparation stained with Giemsa or Leishman stain.
Procedure:
i. Partially immobilize a cockroach by immersing it in Luke warm water in a glass beaker.
ii. Hold the partially immobilised cockroach with forceps or fingers and amputee the thoracic legs from the base of the femur with a sharp scissor, one at a time.
iii. Haemolymph oozes out through the amputated leg. Collect the ooze on the centre of a glass slide by just touching it. Make a thin uniform smear and air dry the smear.
iv. Keep the slide on the staining tray or a petri dish on two fitted rods.
v. Put a few drops of methyl alcohol over the film for fixation. Cover the petri dish and leave it for 5 minutes.
vi. Put a few drops of stain either Giemsa or Leishman over the film and a few drops of neutral water to dilute the stain. Spread the diluted stain over the film uniformly, taking care that no stain trickles down the side of the slide. Cover the petri dish and wait for 10 minutes.
vii. Wash the slide with distilled water (pH 7.0), air dry and observe under microscope.
Observation:
Following types of haemocytes are found:
(Fig. 51.13).
i. Prohaemocyte:
Small, rounded with relatively large nucleus and a basophilic cytoplasm.
ii. Plasmatocyte:
Larger in size than prohaemocyte, with hyaline or basophilic cytoplasm and with cytoplasmic extrusion.
iii. Granular haemocyte:
Slightly smaller in size with acidophilic cytoplasm with granules.
iv. Oenocytoid:
Large spherical cells with strongly acidic homogeneous cytoplasm.
v. Spherule:
Larger spherical cells; the cytoplasm filled with large, non-refringent, acidophilic inclusions.
vi. Adipohaemocyte:
Elongated cells; the cytoplasm with small refringent fat droplets.
Observe and count the number of particular cell type and percentage of each type.


