ADVERTISEMENTS:
Are you researching on experiments on Botany? Do you want to create an amazing science fair project for your next exhibition? You are in the right place. The below given article includes a collection of twenty experiments on botany for helping you to complete your next project/assignment.
Contents:
- Experiments on Imbibition in Plants
- Experiment on Root Pressure in Plants
- Experiments on Stomata in Plants
- Experiment on Transpiration in Plants
- Experiments on Respiration in Plants
- Experiments on Osmosis in Plants
- Experiments on Ascent of Sap in Plants
- Experiments on Plasmolysis in Plants
- Experiments on Photosynthesis in Plants
- Experiments on Plant Growth
ADVERTISEMENTS:
1. Experiments on Imbibition in Plants: (2 Experiments)
Expt. 1. Demonstration of Phenomenon of Imbibition:
Requirements:
Gram seeds water and watch glasses.
ADVERTISEMENTS:
Process:
Take some gram seeds in the water in the watch glasses. Keep them for some time.
Observation:
After some time the seeds got swollen
Explanation:
Here no cell membrane is involved in this process. The pectic or proteinaceous surface attracts the water molecules by intermolecular forces. These pectic substances are hydrophilic in nature.
As the diffusion pressure of dry seeds is zero, therefore the water is absorbed in the seeds. This process remains continued till the diffusion pressure of the seeds and water becomes equal. Thus, the seeds get swollen here.
Expt. 2. Demonstration of developing Pressure during Imbibition:
Requirements:
ADVERTISEMENTS:
A corked jar, a disc fitting in it, a round scale and a pointer attached with the disc, stand, experimental gram seeds and water.
Process:
Take Seeds and water in the jar as directed in the (figure 2.18). Fit the disc over these seeds. To this disc attach the pointer indicating initial reading at zero on the round scale.
The whole apparatus should be airtight. Let this adjustment put as such for few hours.
ADVERTISEMENTS:
Observation and Explanation:
After few hours the pointer moves down showing an upward movement of disc in the jar. Here the gram seeds swell considerably due to imbibition process. These seeds cause a pressure known as imbibition pressure.
2. Experiment on Root Pressure in Plants: (1 Experiment)
ADVERTISEMENTS:
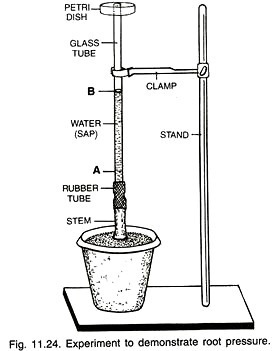
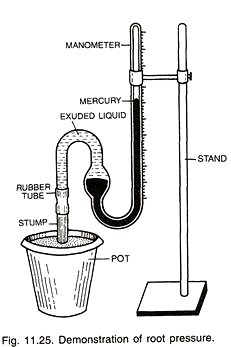
Expt. 3. Demonstration of Root Pressure (Figs. 11.24-25):
Apparatus:
A well watered potted plant of Balsam, Tomato or Bryophyllum, a knife, rubber tubing, a narrow glass tubing, coloured water, a stand, manometer, petridish (non-drying oil).
ADVERTISEMENTS:
Working:
Take a potted plant of Balsam, Tomato or Bryophyllum that has been well watered the previous day Cut off its stem 5-8 cm above the soil level. Fix a narrow glass tubing containing some coloured water to the cut end of stump with the help of rubber tubing. Support the glass tubing by means of a stand cover the open end of glass tubing with a small petridish in order to prevent evaporation of water Fig. 11.24).
Instead a drop of non-drying oil can be poured over the surface of coloured water. Mark the level of coloured water as A. Instead of glass tubing, a pressure measuring instrument called manometer can also be fixed to the cut end of the stump by means of rubber tubing (Fig. 11.25).
Place the apparatus in a moist, cool and shady place for a couple of hours. The level of coloured water in the glass tubing will rise to the new mark, say B. In case the manometer is attached, the mercury level is found to be pushed upwards. The pressure is read on the graduated scale.
ADVERTISEMENTS:
Results:
The rise in the level of coloured water in the glass tubing is due to pumping of sap by root The phenomenon is called root pressure. The same is read directly by manometer. A pressure of up to 5 atm. has been recorded by this method.
Precautions:
(i) The plant should be well watered but the soil should not be flooded
(ii) The soil should not be deficient in minerals,
(iii) Place the apparatus in cool and humid environment.
ADVERTISEMENTS:
(iv) Evaporation from the open end of the tube be prevented by using non-drying oil or petridish.
(v) The plant should be vigorously growing.
3. Experiments on Stomata in Plants: (2 Experiment)
Expt. 4. Demonstration of the Stomatal Opening by Drawin’s Porometer:
Requirements:
Darwin’s porometer, water or mercury, a potted plant, stop watch, etc.
Expt:
This apparatus functions on the principle that the stomatal apertures govern the rate of flow of water. Cement the glass cup to the surface of the leaf by an adhesive (durofix, etc.) and immerse the vertical arm of tube in water or mercury. Open the clip and suck the water to a predetermined height in the vertical arm, close the clip.
Observation:
Two possibilities occur here:
(A) The water level in arm remains unchanged.
(B) The water column begins to fall.
Explanation:
On the closing of the clip, the air inside the porometer undergoes a reduced pressure.
(A) If the stomata under the cup are closed, the water level in the arm will not change.
(B) If the stomata under the cup are open, the air will find its way through them and water column in the arm will begin to fall.
Expt. 5. Effect of Light, Darkness and Dehydration on Stomatal Movements:
Apparatus:
Turgid leaf of a mesophytic dicot, water, strong sucrose or salt solution, slide, cover slip, blotting paper, dropper.
Working:
Remove a peel or strip from the lower surface of mesophytic leaf exposed to sun. Mount the peel in water drop kept over glass slide. Place a cover slip over it. Study the peel under the microscope immediately after exposing the slide to sunlight. The peel will be seen to have a number of open stomata. Each stomatal opening is surrounded by two bent kidney-shaped guard cells. Take the apparatus to shade.
Observe after 10 minutes. The pores in between the guard cells have disappeared, that is, the stomata get closed. Take the apparatus again to sunlight. The stomata open again. In the illuminated slide, remove water from below the cover slip from one end by means of blotting paper.
Simultaneously, introduce concentrated sucrose or salt solution from the other end by means of dropper. When the whole of water has been replaced by concentrated solution, observe under the microscope. The stomata get closed though they are still exposed to light. Replace sucrose solution with water. The stomata open again. Allow the water to get dried. It closes the stomata.
Results:
(i) Opening of stomata in light and their closing in darkness shows that light is essential for the opening of stomata,
(ii) Strong sucrose or salt solution and dehydration have the same effect. The guard cells lose their turgidity and the stomata get closed.
Precautions:
(i) The strip or peel should be carefully removed so that the shock effect is minimum.
(ii) Keep the lower end of leaf dipping in water before use?
(iii) The strip should not be left out to dry. It must be immediately dipped in water.
4. Experiments on Transpiration in Plants: (2 Experiments)
Expt. 6. Demonstration of Transpiration:
Apparatus:
A well-watered potted plant, vaseline, oil cloth, strong thread or clamping rubber bands, glass slab and a bell jar.
Working:
Take a small well watered potted plant. Cover the external surface of pot and its soil with oil cloth. Place the potted plant on a glass slab in a cooler place and invert a dry bell jar over it.
Seal the edges of the bell jar with vaseline so that no air enters the apparatus from outside (Fig. 11.31). Leave the apparatus undisturbed. Soon the interior of the bell jar becomes misty. Afterwards drops of water will be found on the inner surface of the jar.
Results:
The drops of water which appear on the inside of the bell jar cannot come from the outside air, nor from the water present in the soil of the pot because both have been properly sealed. The water vapours can come only from the exposed aerial shoot of the plant. Such a loss of water from the plant is called transpiration.
Precautions:
(i) Do not place apparatus in a very warm place as the water vapours will not be able to condense.
(ii) Keep the apparatus undisturbed.
(iii) Use a glass slab or smooth surface as the base for the apparatus.
(iv) Seal the edges of bell jar so as to avoid the entry of water vapours from outside,
(v) Cover the soil and the exterior of the pot properly with oil cloth.
Expt. 7. Demonstration of Transpiration from Foliar Surface:
Apparatus:
3-5% cobalt chloride solution, two small pieces of filter paper, desiccator or oven, forceps, leaf clasp, slides, vaseline, a potted plant or fresh shoot of Pipal or Mulberry with one end in water.
Working:
Dip two small pieces of filter paper in 3-5% cobalt chloride solution. Take them out and dry in an oven or desiccator till they become blue. Clean the lower surface of leaf gently with dry cotton. Place a dry cobalt chloride paper over it. Quickly cover the paper with a glass slide and seal its sides with vaseline. Fix them to the leaf clasp (Fig. 11.33).
Within a few minutes the colour of the cobalt chloride paper will turn pink. No such change occurs in the dry cobalt chloride paper kept in between two glass slides with the edges sealed to prevent entry of water vapours from air (Fig. 11.34). Instead of glass slide and vaseline, cellotape can be used in both the cases.
Results:
Cobalt chloride is blue in the anhydrous condition but becomes pink in contact with water. The change of colour of the cobalt chloride paper from blue to pink clearly indicates that the paper has received water from the surface of leaf.
Precautions:
(i) Use dry forceps.
(ii) Dry the leaf surface gently with dry cotton.
(iii) Handle the leaf gently.
(iv) Seal the edges of the slide completely but gently with vaseline.
5. Experiments on Respiration in Plants: (2 Experiments)
Expt. 8. Demonstration of Anaerobic Respiration:
Apparatus:
A test tube of hard glass, a deep petri dish or beaker of hard glass, mercury, soaked and peeled seeds of pea or gram, potassium hydroxide stick or pellet, forceps, stand.
Working:
Invert a hard glass test tube full of mercury over a petri dish containing mercury. Slightly lift the test tube from the bottom of the dish (do not take it out of the mercury level) and introduce into its mouth a few soaked and peeled seeds of pea or gram by means of forceps. The seeds will rise upwards (Fig. 14.11 A).
After some interval, the level of mercury will fall in the test tube showing that some gas has collected there (Fig. 14.11 B). Introduce in the test tube a potassium hydroxide stick by means of forceps. The level of mercury will rise again.
Results:
In the test tube full of mercury there is no air and, therefore, the introduced soaked seeds do not get air for their respiration. But they are capable of respiration in the absence of oxygen as is indicated by the evolution of a gas.
The gas is carbon dioxide because it can be absorbed by potassium hydroxide forming potassium carbonate and water. Therefore, anaerobic respiration takes place in the seeds in the absence of free oxygen. The experiment also shows that carbon dioxide is evolved in anaerobic respiration of seeds.
Precautions:
(i) The mouth of the test tube must be smooth
(ii) The dish for mercury should be deep,
(iii) While inverting the test tube of mercury, close its mouth by your thumb,
(iv) The seeds should be well soaked so that they are respiring actively.
(v) Do not touch potassium hydroxide with hand. Replace the cover of its bottle immediately after taking out the required pellet or stick.
Expt. 9. Measurement of R.Q. by Ganong’s Respirometer:
Requirements:
Ganong’s Respirometer, respiratory substrate, etc.
Experiment Procedure:
The respiratory quotient may easily be measured by Ganong’s respirometer. In Ganong’s respirometer the amount of oxygen absorbed and carbon dioxide released out during respiration are determined simultaneously. The respirometer consists of a bulb with a graduated side tube.
The volume of the apparatus is about 102 c.c. The stopper and neck of the bulb are each provided with hole. The stopper may be turned to bring the two holes opposite each other so that the air inside the bulb may communicate with the outer air and is at the atmospheric pressure. The side graduated tube is connected with a levelling tube by a rubber tubing.
For the determination of respiratory quotient the manometer is filled with mercury or a saturated solution of common salt. The water cannot be used since carbon dioxide dissolves in it. Carbon dioxide is slightly soluble in salt solution and therefore, best results can be obtained when mercury is used.
Two c.c. of plant material, the R.Q. of which is to be measured is being placed inside the bulb. In the beginning the air of the graduated tube is kept in direct communication with the atmospheric air at the atmospheric pressure.
The mercury in both the tubes is brought to the same level by raising or lowering the levelling tube. Now the stopper in the neck of the bulb is turned so that the two holes get apart and the air in the apparatus is cut off from the outside air and respiration proceeds in closed chamber.
Observation and Explanation:
The initial level of mercury in the graduated tube is noted. The level is again noted after about an hour. If the respiratory substrate kept in the bulb is carbohydrate, the amount of carbon dioxide released during respiration will be equal to the amount of oxygen absorbed and therefore, there will be neither a rise and nor a fall in the mercury level.
If caustic potash (KOH) is now added to the apparatus, the accumulated carbon-dioxide, will be absorbed, and hence a rise in the mercury level, and thus the amount of carbon dioxide can be measured. The volume of oxygen absorbed will be equal to the volume of carbon dioxide measured. Hence the R.Q. is unity.
When the respiratory substrate is a fat, the respiratory quotient is less than one. Here the amount of carbon dioxide released is less than the amount of oxygen absorbed and therefore, a vacuum is created in the closed chamber.
This results in the rise of mercury level. This rise of mercury level is denoted by V1 c.c. that is equivalent to the excess oxygen. Now the caustic potash (KOH) is added and there is a further rise of mercury level. The second rise in the mercury level is denoted by V2c.c.
This represents the volume of carbon dioxide liberated. This way, the total amount of oxygen absorbed is equal to V1 + V2 c.c. the respiratory quotient will therefore, be less than one.
When the respiratory substrate is such that the carbon dioxide released is more than the volume of oxygen absorbed during respiration, the mercury level falls. The fall in the mercury level is denoted by V1 c.c. that is equivalent to the excess carbon dioxide.
Now the caustic potash is added to the tube. It absorbs the total amount of carbon dioxide and therefore, the mercury level rises. The rise is denoted by V2 c.c. that is equivalent to the total volume of oxygen absorbed is then V2– V1. The respiratory quotient will, therefore, be more than one.
6. Experiments on Osmosis in Plants: (3 Experiments)
Expt. 10. Thistle Funnel Experiment:
Apparatus:
10% sugar solution, a long stemmed thistle funnel, animal bladder, egg membrane or parchment paper, thread, scissors, rubber solution, beaker, water, glass marking pencil or gummed paper and stand.
Egg membrane is prepared by first removing the yolk and albumin of the egg through a small hole at one end. The egg shell with membrane is then placed in dilute hydrochloric acid for a few hours when the shell will dissolve. The egg membrane is left intact.
Working:
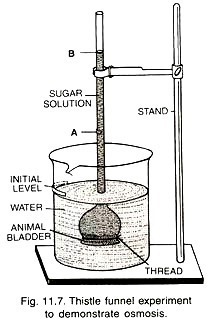
Take a thistle funnel having a long stem. Close the mouth of the funnel with a membrane of animal bladder or parchment paper by means of thread. Remove the free edges of the membrane with the help of scissors as close to thread as possible. The terminal edges of the membrane are then sealed by applying rubber solution. This makes the joint water tight.
Pour 10% sugar solution in the thistle funnel till it stands at about 1/3 of the height of the stem. Now dip the covered end of the thistle funnel in a beaker containing water (Fig. 11.7).
Support it in its position by means of a stand. Mark the level of sugar solution as A by means of glass marking pencil or gummed paper. Note that after a few minutes the level of the sugar solution has risen in the stem of thistle funnel to a point В while the level of water falls down in the beaker. Taste the water of the beaker. It is not sweet.
Results:
The rise of sugar solution in thistle funnel can only be due to the entry of water into it through the animal bladder. But no sugar has gone out into the water of the beaker as it does not taste sweet.
The experiment, therefore, proves that:
(i) Animal bladder, egg membrane or parchment paper is a semipermeable membrane because it allows only water to pass through it.
(ii) Sugar solution is an osmotically active solution and can absorb water when it is separated from it by a semipermeable membrane,
(iii) Water diffuses into a solution when the two are separated by a semipermeable membrane. The phenomenon is called osmosis.
Precautions:
(i) The edges of the animal bladder must be properly sealed,
(ii) The thread should be tied carefully so as not to rupture the membrane,
(iii) The initial level of sugar solution should be marked only after dipping the mouth of thistle funnel inside water of the beaker,
(iv) Pour sugar solution in the thistle funnel in such a way as not to leave any air bubble,
(v) Support and fix the thistle funnel firmly in its vertical position by means of a stand.
Expt. 11. Potato Osmoscope:
Apparatus:
A large potato, a knife or scalpel, 20% sugar solution, petri dish containing water, two pins.
Working:
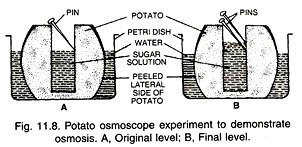
Take a large sized potato tuber. Cut one side of it so as to make it flat. Bore a cavity from the other side in such a way that a very thin base is left intact on the flat side. Also remove the skin near the edge of the flat end because skin of the tuber is impermeable to water.
Pour 20% sugar solution in the cavity of the tuber up to ½–¾%. Mark the level of sugar solution in the cavity with the help of a pin (Fig. 11.8 A). Place the tuber on its flat cut end in a petri dish half full of water. Note that after some time the level of the sugar solution has risen in the cavity. Mark this reading also with another pin (Fig. 11. 8 B).
Results:
The rise in the level of sugar solution in the cavity of the potato tuber indicates that the solution has absorbed water from the petri dish. The two are separated from each other by a large number of cells of the tuber.
The entry of water into the sugar solution, therefore, proves that:
(i) Sugar solution is osmotically active solution,
(ii) The cytoplasm of the cells of the tuber that lie between the sugar solution and the water of the petri dish act as a single semipermeable membrane,
(iii) Water enters the sugar solution when it is separated from it by semi-permeable membrane. This process is called osmosis.
Precautions:
(i) The cavity should be deep so as to leave only a thin layer of tissue at the base,
(ii) Peel off the skin of the tuber from the base and the sides,
(iii) Make the base flat so as to keep the tuber flat in the dish,
(iv) Sugar solution should have a higher osmotic concentration as compared to cell sap of the tuber cells.
Expt. 12. Demonstration of Endosmosis and Exosmosis:
Apparatus:
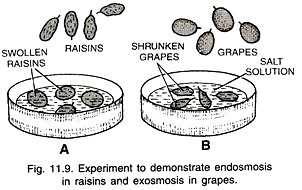
A few grapes and raisins with intact stalks, water, and 10% salt solution, petri dishes. Place a few raisins in water for about 5—6 hours. Raisins will swell up. The swelling can be due to the absorption of water from the petridish.
In another petri dish place a few fresh grapes (or swollen raisins) and pour 10% salt solution into the dish. After a few hours the grapes will shrivel which can be possible only when they have lost water to the salt solution (Fig. 11.9).
In the first case the raisins have absorbed water from the outside due to the presence of higher concentration of solute in them. This is an example of endosmosis. In the second case, the grapes have lost water to the salt solution because salt solution is more concentrated than the sap present in grapes. Therefore, it is an example of exosmosis.
Precautions:
(i) Grapes and raisins should be with intact stalks, and
(ii) The solution for exosmosis must be stronger than sap concentration of grapes.
7. Experiments on Ascent of Sap in Plants: (2 Experiments)
Expt. 13. Stain Test:
Apparatus:
A leafy shoot (e.g., Balsam) preferably with white flowers freshly cut under water, 2% eosine solution, a stand, razor, slide and microscope.
Working:
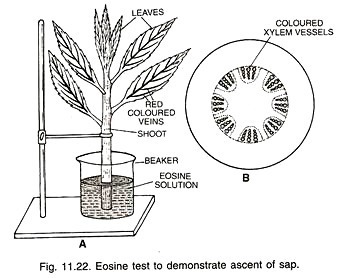
Take a leafy shoot freshly cut under water. Dip the cut end of the shoot in an eosine solution contained in a beaker. Hold the leafy shoot erect by means of a stand. After some time veins of the leaves will become red (Fig. 11.22 A).
Flowers develop the same colour. Even stem may look reddish. Cut thin transverse sections of the stem and leaves. Observe them under the microscope. The walls of tracheids and vessels will be found coloured (Fig. 11.22 B).
Results:
The veins of the leaf consist of vascular bundles. The appearance of red colour in the vein of leaf shows that the coloured water travels through the vascular bundles. The microscopic examination of the sections proves that the coloured water moves through vessels and tracheids of xylem.
Expt. 14. Ringing Experiment (Fig. 11.23):
Apparatus:
Two leafy shoots cut under water, a fine knife, a needle, two beakers, stand, and water.
Working:
Cut two leafy shoots under water. Keep their lower ends dipping in water? In one shoot remove 2-4 cm long ring of bark roughly in the middle region of the shoot. Remove the pith of the stem of this or basal 4-6 cm long region by means of a needle.
Remove the xylem in the middle of the second shoot. Fix the shoots to stand and allow the apparatus as such for 1- 2 days. The leaves of the first shoot will remain turgid while those of the second shoot would get wilted.
Results:
In the first shoot the leaves remain turgid even after 24 hours showing clearly that water continues to rise upwards the leafy shoot despite removal of bark and pith. Removal of bark breaks the continuity of epidermis, cortex, and phloem.
As pith has also been discontinued, it shows clearly that epidermis, cortex, phloem and pith do not take part in transport of sap or water. The only tissue left intact is xylem. Xylem, therefore, must be the tissue taking part in the transport of water. This is confirmed from the wilting of the second shoot in which xylem has been discontinued.
8. Experiments on Plasmolysis in Plants: (2 Experiments)
Expt. 15. Demonstration of Plasmolysis
To demonstrate this process experimentally, one will have to take the red coloured epidermal peel of the lower surface of Tradescantia leaf. Now, this peel is mounted in a drop of water on a microscopic slide and then examined under the microscope.
At this moment the cells are fully turgid, and are filled up with red coloured cell sap. Now, this epidermal peel is kept in a drop of salt or sugar solution and again examined under the microscope.
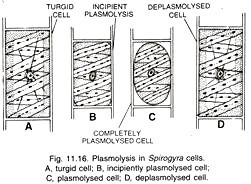
The exosmosis occurs and the cell shrinks in its size. The cell soon reaches to its minimum volume. If the exosmosis continues further, there is no further shrinkage in the cell wall, but the protoplasmic membrane begins to recede or contract from the corners first. This stage is called the incipient plasmolysis.
If exosmosis continues further, there is further contraction of the protoplasmic membrane, thus reaching the complete plasmolysis stage. In the case of complete plasmolysis the cell sap, protoplasm and nucleus, etc., are completely contracted in the centre of the cell leaving away the cell wall.
The in between part of the cell is filled up with the sugar or salt solution. Here, around the vacuole, the protoplasmic membrane acts as a semipermeable membrane, which allows water to come out through it and leaving other contents inside the cell.
If the plasmolysed cells are again placed in water, there is recovery to the original condition due to endosmosis of water, and this process is called deplasmolysis.
Continuous loss of water from plant cells results in wilting and drooping of leaves and stems.
Expt. 16. To show Plasmolysis:
Apparatus:
A fresh filament of Splrogyra or a fresh peel from the lower leaf surface of Rhoeospathacea (= R. discolor = Tradescantia discolor), 10% solution of potassium nitrate or common salt, a slide, cover slip, microscope, water, dropper and a piece of blotting paper.
Working:
Mount a fresh filament of Spirogyra or peel of lower leaf surface of Rheo spathacea (= R. discolor) on a slide in a drop of water. Examine it under microscope and note that the cells are fully distended or turgid.
Now replace the drop of water with a drop of 10% solution of potassium nitrate or common salt. The cells shrink in size. The shrinking protoplast becomes conspicuous due to presence of ribbon-shaped chloroplasts in Spirogyra and coloured sap in Rhoeo.
It is followed by the separation of the protoplast from the cell wall due to its contraction. This shrinkage of the protoplast from the cell wall under the influence of a strong solution is called plasmolysis (Figs. 11.16 – 17).
If potassium nitrate or common salt solution is now replaced by water again, the protoplast starts swelling. It comes in contact with the cell wall and the cell regains its original size. The swelling up of the plasmolysed protoplast under the influence of a weak solution or water is called deplasmolysis (Fig. 11.16D).
Results,
(i) The shrinkage of the protoplast under the influence of 10% potassium nitrate or common salt solution and later its swelling when placed in water shows that the protoplast possesses an osmotically active solution in its interior. The solution is called cell sap.
(ii) The cell wall is fully permeable,
(iii) The contraction of the cell as a whole is due to the reduction in the turgor pressure till the wall pressure becomes zero. When the wall pressure becomes zero, the cell does not contract further. Only the protoplast shrinks now.
(iv) Shrinkage of protoplast during plasmolysis and its expansion during deplasmolysis points out that the cytoplasm lying around the central vacuole acts as a semi-permeable membrane,
(v) 10% potassium nitrate or common salt solution is stronger than cell sap.
Precautions:
(i) The experimental material (Spirogyra filament, Rhoeo leaf peel) must be fresh and living,
(ii) The external solution must not be too strong as to become toxic,
(iii) Wash at least once the experimental material with external solution so that chances of dilution are minimised,
(iv) For deplasmolysis, the material has to be washed at least twice with water.
9. Experiments on Photosynthesis in Plants: (2 Experiments)
Expt. 17. Demonstration of Importance of light’s Colour for Photosynthesis in land plants by Ganong’s Big Light Screen.
Requirements:
Ganong’s big light screen, a potted plant, 70% alcohol, iodine solution, water, burner, etc.
Experiment:
The Ganong’s big light screen is taken as shown in the figure. This consists of red, green and blue coloured glass screens. A long leaf is detached from a potted plant, previously kept in darkness for 48 hours and the leaf is kept under the 3 coloured screen for three or four hours in sunlight so that the photosynthesis may take place. Thereafter the leaf is tested for starch.
Observation:
The portion of the leaf remained under red-coloured screen gives the positive starch test with deep blue colour. The portion of the leaf remained under the blue coloured screen also give positive starch test, but with fade blue colour. The part of the leaf remained under green-coloured screen either gives negative starch test or very less formation of the starch.
Explanation:
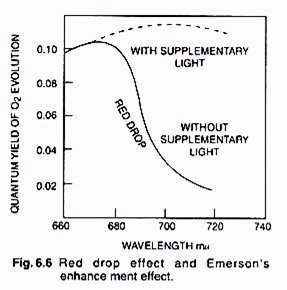
This way, this experiment proves that the red and blue coloured rays are absorbed to the utmost by the chlorophyll. The absorption of the green rays by the chlorophyll is the lowest. The rate of photosynthesis is the highest under red screen and lowest under green screen.
Expt. 18. To prove that light is essential for photosynthesis (Fig. 176). A potted plant is kept in a dark room for two or three days, so that all the leaves become starch-free. To be doubly sure, one leaf is plucked and tested with iodine.
Light:
The enormous quantity of energy essential for the formation of carbohydrates comes from sunlight. The radiant energy absorbed is not, of course, lost but remains stored up in the product of photosynthesis as potential energy. Of the seven different rays of the sun, light red and blue rays are mainly absorbed by the chloroplasts.
In higher plants chlorophyll is not formed in the absence of light when the plants get etiolated, though in many lower plants light is not essential for chlorophyll formation. That photosynthesis will not take place in the absence of light can be demonstrated by the following experiment:
Now portions of one or two leaves of the plant are covered carefully with black paper on the upper and lower sides with the help of a clip. The whole plant is exposed to sunlight. In the evening those leaves are collected, decolorized and tested with iodine. The exposed parts of the leaves turn blue, but the covered parts do not give iodine reaction, suggesting thereby that starch is not formed in the absence of light.
Temperature:
Though photosynthesis takes place even in very low temperature, yet an optimum temperature near about 32°C is most suitable for the process. This factor, however, varies with the plants and climatic conditions.
Chlorophyll:
The most important internal condition for photosynthesis is the presence of green pigment, chlorophyll, in the plastids. Photosynthesis is possible only because the chloroplasts can absorb radiant energy from sunlight. Chlorophyll is a complex organic matter.
It is really a mixture of two pigments— chlorophyll a, which is blue-green in colour and chlorophyll b, which is yellowish-green. In higher plants the ratio of chlorophyll a and b is remarkably constant, varying from 3-3, 5 to 1.
Two yellow pigments, carotin and xanthophyll, accompany chlorophyll. The yellow pigments are collectively called carotenoids. They are invariably present whenever there is chlorophyll, but they can also occur independently, as in many flowers and fruits.
Chlorophyll can be extracted by boiling in alcohol. Chlorophyll also dissolves in acetone, chloroform, benzene, etc. An ethyl alcoholic solution of chlorophyll, if shaken with benzene, separates into two layers— the upper benzene layer contains chlorophyll a, chlorophyll b and carotin, while the lower alcohol layer contains xanthophyll.
The complete separation of the four pigments involves still further elaborate methods. Chlorophyll in alcoholic solution exhibits fluorescence, i.e. it appears brownish-red by reflected light and green by transmitted light.
Protein Synthesis:
Proteins are very complex organic matters found in the plants. They form an integral part of protoplasm and are also essential for nutrition. Besides carbon, hydrogen and oxygen, they contain nitrogen, often sulphur and phosphorus. The formulae of a few common proteins would show how complex they are. Gliadin (a protein of wheat)—C685H1063N196O211S5; Zein common protein of maize—C726H1101N184O206S3.
The process of protein synthesis is complicated. Carbohydrates formed by photosynthesis serve as ground substance. Nitrogen, sulphur and phosphorus are derived from soil as salts, i.e. as nitrates, sulphates and phosphates and conducted upwards through the xylem vessels.
Proteins are mainly constructed in the leaves having abundant sugar. This process is independent of light. Necessary energy is obtained by oxidation of sugar during respiration.
Nitrates are first reduced into nitrites. Then amino acids, the simple soluble nitrogenous matters, are synthesised out of nitrites and sugars. Finally, amino acids are linked up together to form complex protein molecules by enzyme action. Thus proteins are chains of amino-acids.
Fat Synthesis:
Fats are very important energy-giving food. They also make up a part of protoplasm. They are composed of carbon, hydrogen and oxygen like the carbohydrates, but the relative hydrogen-oxygen proportion is not maintained, the fats containing relatively little oxygen. Olcin—a fat present in olive oil has the formula C37H104O6. Fats are abundantly present in storage regions.
The process of fat synthesis is equally complex. Light and chlorophyll have no influence on this process. Fats are manufactured out of simpler matters, glycerine and fatty acids. Glycerine is possibly formed from glucose and fatty acids by fermentation of sugars. So here also the products of photosynthesis are the ground materials. By the action of enzyme, lipase, glycerine and fatty acids are condensed to form fats.
ADVERTISEMENTS:
10. Experiments on Plant Growth: (2 Experiments)
Expt. 19. Demonstration of effect of gibberellic acid GA3 on elongation.
Requirements:
Prepared aqueous (1000.0) solutions of GA3 having 0.01, 0.1, 1.0, 10.0 and 1000.0 mg/ml, young plants of dwarf and tall varieties of peas, distilled water.
Experiment:
Take ten dwarf variety plants and ten tall variety plants. Apply 1 ml. of a GA3 solution to a young leaf of each of the plants. Do this application again after one week. Distilled water is applied as a control in separate plants. Measure the height of each daily for fifteen days.
Observation and Explanation:
Each time there is a clear elongation in the plant height. The growth response in dwarf variety increases with the increase of concentration of GA3.
Expt. 20. Demonstration of effect of kinetin of senescence.
Requirements:
Solutions of kinetin containing 0, 0.001, 0.01 and 100.0 mg./litre of hormone, mature fresh leaves of radish, sterile distilled water, petri dish, filter paper, etc.
Expt:
Take mature fresh leaves of radish plant and wash them with sterile distilled water. Keep them in petri dishes on moist filter paper. Apply 0.5 ml of one of the kinetin solutions per leaf. Examine the leaves daily for a week.
Observation and Explanation:
The leaves turn yellow after a week. This is due to disappearance of chlorophyll and degradation of proteins.


